
The theme for this year is the 'Year of the Blogger', celebrating bloggers and what we do (which for me lately hasn't been much! Sorry!). The colours I was provided with for Blog Fest were 'Wisteria', 'Marine', and 'Peaches n' Cream'.
 |
| L-R: 'Wisteria', 'Marine', 'Peaches n' Cream' |
As part of Blog Fest, we're challenged to come up with some nail art containing the three colours we've been sent. I'm not going to lie, this was one hell of a challenge for me. Although they look fine on screen and they're beautiful on their own, in real life I found that these three colours clashed and I pulled my hair out for about 3 weeks before coming up with this final design, using the black to offset the clash:
 |
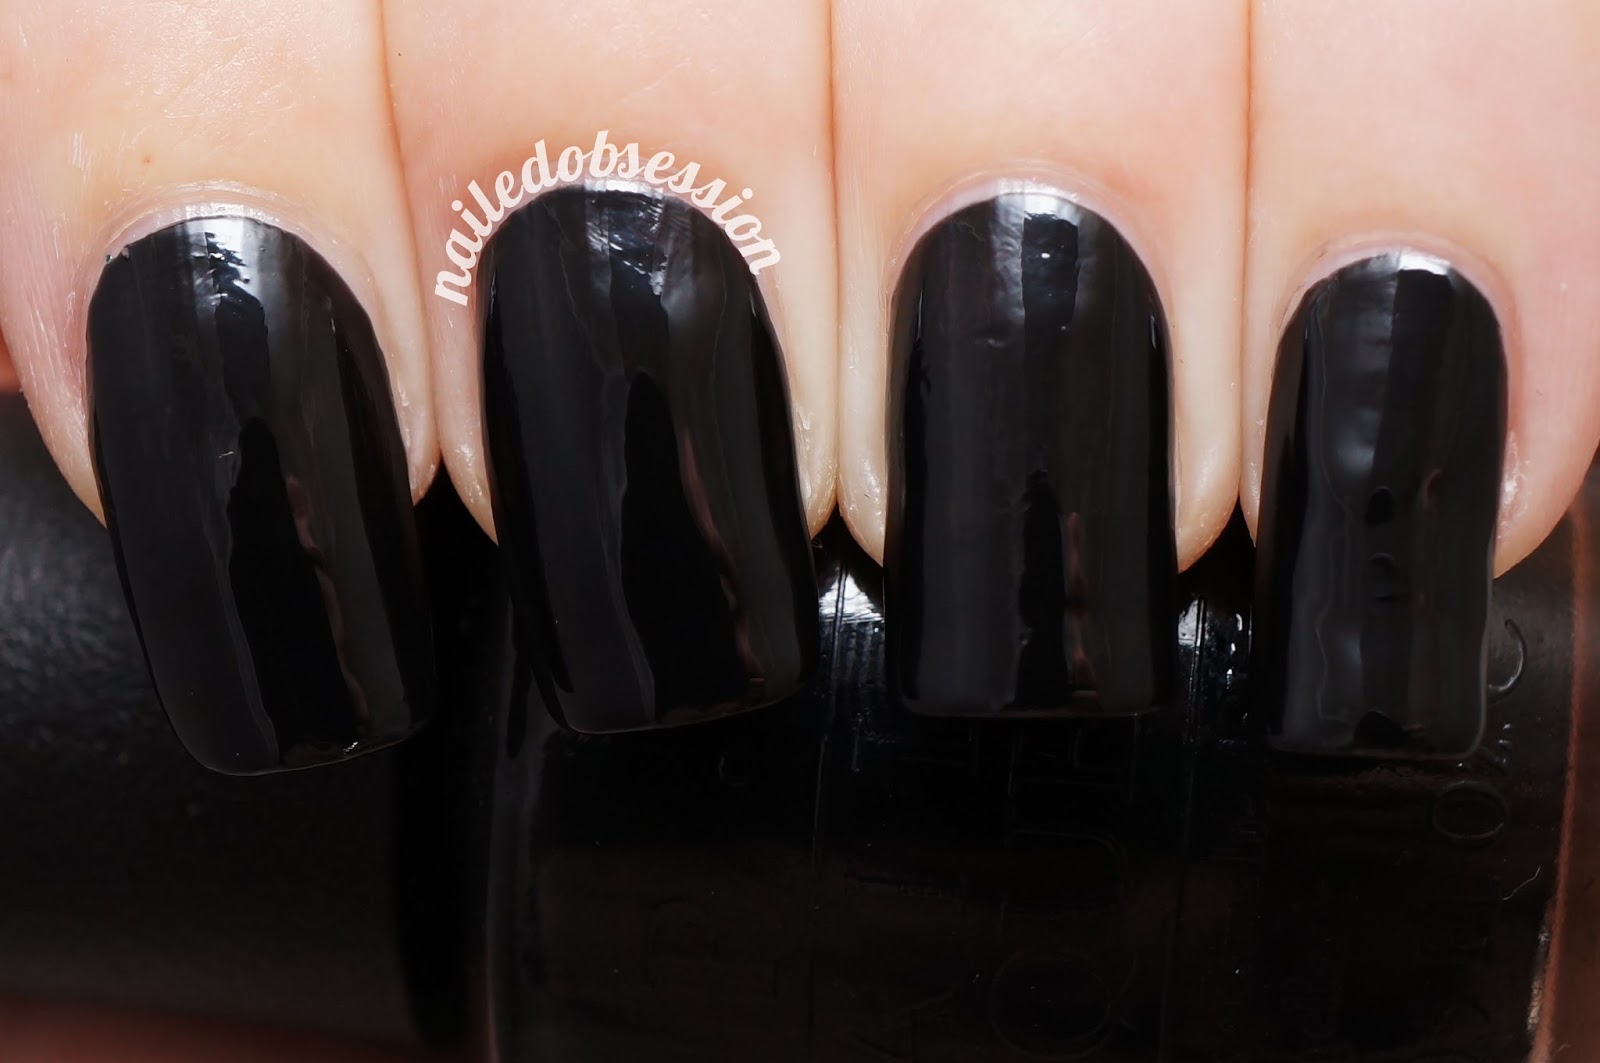
| Lamp light |
 |
| Lamp light |
I also have a little tutorial for you. Here goes!
Step 1: The night before you do your mani, paint some polish onto sticky tape/baking paper and leave to dry overnight. I used 2 coats of 'Wisteria' and 'Marine' and 3 of 'Peaches n' Cream' for opacity.

Step 2: Carefully peel the strips of dried polish from the sticky tape/baking paper and cut them in to small rectangles. Mine were approximately 8mm by 5mm.

Step 3: Apply a protective base coat and then paint your nails black.
Step 4: Once your black polish has dried, apply a clear coat of polish and use tweezers to position the polish pieces and some studs on your nails. You'll need to work quickly while the polish is still wet.
Step 5: Apply a clear top coat to smooth out the polish pieces and hold the studs in place and your done!
What do you guys think? These are my first piCture pOlish shades, and they won't be my last. They apply smoothly and I love that 'Wisteria' and 'Marine' are opaque in 2 coats.
PiCture pOlish products are available worldwide both via their website and distributors. Check our their shipping and network pages for more info. And don't forget to follow them on Facebook, Pinterest, Instagram, Twitter, and YouTube. There will also be 'Blog Fest Awards' where you guys can vote for your favourite design on their Pinterest page so go check that out!
Here's a list of links to some of the others involved in the piCture pOlish Blog Fest:
Disclosure note: The product/s in this post were provided for review. This did not affect my opinion of the product/s.
I must say I think I would feel the same way if I had to come up with something using these three shades. At first they look like they clash a little, but your manicure truly made them look SO stunning together! Simply gorgeous :)
ReplyDeleteThank you!
DeleteYou did a fantabulous job Anthea!!
ReplyDeleteThanks :) I don't feel like it's my most creative work by any means but I'm happy with the outcome.
DeleteI think you have made them look amazing together! I love this mani
ReplyDeleteThanks ;)
DeleteThis looks fantastic! They work really well. Congrats :)
ReplyDeleteThanks SC!
DeletePretty! These look great with the black background!
ReplyDeleteWisteria and Marine are two of my favourite PP shades, ever!
ReplyDeleteI love what you've done here, you've made the shades work brilliantly and the studs are a gorgeous addition.
xx
Thank you!
DeleteSuch a fashionable design! Love it~
ReplyDeleteWhat a clever way of doing a block design! It looks amazing!
ReplyDeleteThanks! I'm terrible at tape manis so this seemed like a good alternative!
DeleteI love this - so cool!
ReplyDeleteThanks Michelle :)
DeleteStunning color block, the shades matches perfectly and the detail of the studs are simply perfect :)
ReplyDeleteWell done!
Thank you!
DeleteI love the clashy clashy look and you've done it brilliantly - the black really makes it pop!
ReplyDeleteThanks! Clashy is something that I've never been good at so I'm glad everyone likes it so much!
DeleteAnd the beauty here is that they look like the TOTALLY go together in your mani! Awesome!
ReplyDeleteThanks :D
DeleteThis is such a classy look, I love how it turned out!
ReplyDeleteThanks Rebecca :)
DeleteThis looks so stylish and those colour just 'pop' against the black :)
ReplyDeleteThanks! Definitely glad that I chose to go with a black base!
DeleteAh, the overnight drying tip was much needed - thanks!
ReplyDeleteYou're welcome ;)
DeleteLooks fab, very Aztec in design :)
ReplyDeleteThanks Jas! My bf actually suggested that I do something aztec with the colours when he saw them so he'll be glad that that showed through ;)
DeleteI like the technique you used! Great manicure!
ReplyDeleteOh what a lovely design :)
ReplyDeleteI love the colors, the technique :) Everything :)
You did a wonderful job sweetie :)
Im a new subbie btw :)
hugs
xx
Thank you! :D
DeleteAdd the black was a great idea. I love how this design really lets each colour stand out on its on - it showcases all three polishes, as Blog Fest surely should.
ReplyDelete*Adding
DeleteHi! Excuse me for any mistakes in this post, I'm French. ;) I adoreton nail art, it is beautiful, pretty, chic, class, and well done! Good luck,
ReplyDeletePiiiou.
Thanks Piiiou!
DeleteAwesome post ! Thank you for, posting on my blog page dude! I shall message you soon! I didnt know that!
ReplyDeletejeux de reflexion